In part 1 of boost leak testing, I erroneously thought it normal for the idle air valve (IACV) to leak boost when the car was off. As it turns out, I was wrong, and the IACV is a common and rather large leak that needs to be addressed. The part in question is pictured below.

When the manifold was pressurized during boost leak testing, air leaked out of the main air line attached to the valve, as well as through the plastic body of the valve motor. Apparently, this isn’t normal!
To get to the parts we need to access, the whole valve assembly needs to be pulled off of the manifold. It could probably be done with the intercooler in place but a little extra room is always nice. Out comes the intercooler, and the air line and electrical connector are pulled from the IACV. There are two coolant lines on the IACV but they don’t need to be pulled.

On EJ20K manifolds there are three bolts that need to be removed to separate the IACV from the manifold. I believe there are four bolts on EJ20G engines. Note that there is a fourth bolt hole in the IACV, but no bolt.

Out they come and the IACV is free from the manifold. Here’s what the IACV side looks like:

and the manifold side (note only three bolt holes):

See that scummy-looking black rubber piece and the pie-looking thing behind it? Well, they’re what’s responsible for keeping the boost in. They should pull out fairly easily.

The best way to get a new seal with these parts is to simply replace them. However, I have it on good authority that these parts aren’t available from Subaru North America. Also, I’m cheap! Let’s clean and fix these seals.
The pie-looking part is actually a check valve and serves to allow idle air into the manifold, but also holds back boost pressure from escaping. The big black rubber seal serves to make a seal for the check valve against the manifold. If either of these pieces aren’t doing their job, we have boost leak. Seeing as we don’t know which one is at fault, they’ll both be cleaned and sealed.
Cleaning the black rubber is pretty straightforward. Use a mild cleaning agent (NOT brake or carburetor cleaner - they don’t play nice with plastic and rubber parts) and go over all the surfaces.
Cleaning the check valve is a bit harder. Make sure to clean the metal parts and also the rubber piece that is sandwiched in between. A q-tip works well for this.

Hey, look! It’s red under all that grime!

Also clean out the place where these parts lived in the manifold.

Now that everything is nice and clean, we can go about making them seal again. Red silicone to the rescue!

You want to get it on the surface that seals with the check valve, but not so much that it will get INTO the check valve. Just a light coating. Less than what I have pictured above. Put on a glove and smear that silicone around the whole rubber seal, with the exception of the side that meets the IACV valve. There’s nothing to be gained or lost by putting silicone there.

Now the check valve is attached to the rubber seal, and the whole shebang is reinstalled into the manifold. A little extra silicone smeared around the edge of the rubber seal is extra insurance against further boost leaks.

That’s it. Everything is reinstalled and we’re back in business. As a note of caution, always be careful when tightening bolts into aluminum, such as the three IACV to manifold bolts. I don’t know the exact torque spec, but you’re better off under tightening the bolts and having a boost leak (which can be tightened up and fixed) rather than over tightening and stripping the threads out of the manifold (which is not an easy thing to fix).
Give the silicone time to cure. Overnight is best. The danger of starting your car up right away is the possibility that the still soft silicone will make its way into the check valve, or past it and into the manifold. Silicone doesn’t belong anywhere near intake valves and engine cylinders!
With my HKS boost controller set on minimum setting, supposedly this reverts back to a factory boost level. As you can see here, before sealing the IACV a third gear pull on factory boost gives a maximum reading of 73kPa (about 10.5 psi). That’s a bit low. It also doesn’t come on until about 3500-4000 rpm.

With the IACV boost leak fixed, a small boost increase was had, but more importantly it came on a few hundred RPM earlier.

To make sure it sealed properly, the last step was to remove the intercooler and boost-check the manifold again. Nothing leaked from the IACV this time. Success!
Incidental supplies:
Red RTV silicone
q-tip
cleaning solution

When the manifold was pressurized during boost leak testing, air leaked out of the main air line attached to the valve, as well as through the plastic body of the valve motor. Apparently, this isn’t normal!
To get to the parts we need to access, the whole valve assembly needs to be pulled off of the manifold. It could probably be done with the intercooler in place but a little extra room is always nice. Out comes the intercooler, and the air line and electrical connector are pulled from the IACV. There are two coolant lines on the IACV but they don’t need to be pulled.

On EJ20K manifolds there are three bolts that need to be removed to separate the IACV from the manifold. I believe there are four bolts on EJ20G engines. Note that there is a fourth bolt hole in the IACV, but no bolt.

Out they come and the IACV is free from the manifold. Here’s what the IACV side looks like:

and the manifold side (note only three bolt holes):

See that scummy-looking black rubber piece and the pie-looking thing behind it? Well, they’re what’s responsible for keeping the boost in. They should pull out fairly easily.

The best way to get a new seal with these parts is to simply replace them. However, I have it on good authority that these parts aren’t available from Subaru North America. Also, I’m cheap! Let’s clean and fix these seals.
The pie-looking part is actually a check valve and serves to allow idle air into the manifold, but also holds back boost pressure from escaping. The big black rubber seal serves to make a seal for the check valve against the manifold. If either of these pieces aren’t doing their job, we have boost leak. Seeing as we don’t know which one is at fault, they’ll both be cleaned and sealed.
Cleaning the black rubber is pretty straightforward. Use a mild cleaning agent (NOT brake or carburetor cleaner - they don’t play nice with plastic and rubber parts) and go over all the surfaces.
Cleaning the check valve is a bit harder. Make sure to clean the metal parts and also the rubber piece that is sandwiched in between. A q-tip works well for this.

Hey, look! It’s red under all that grime!

Also clean out the place where these parts lived in the manifold.

Now that everything is nice and clean, we can go about making them seal again. Red silicone to the rescue!
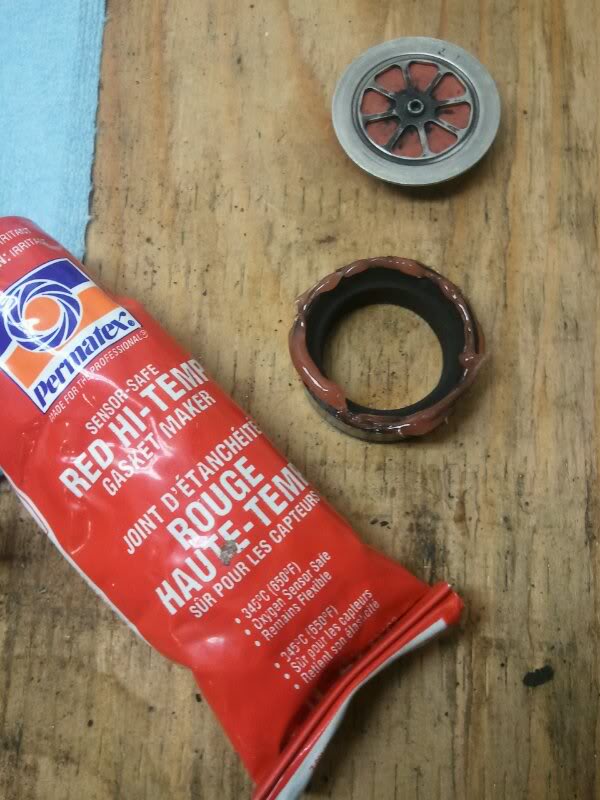
You want to get it on the surface that seals with the check valve, but not so much that it will get INTO the check valve. Just a light coating. Less than what I have pictured above. Put on a glove and smear that silicone around the whole rubber seal, with the exception of the side that meets the IACV valve. There’s nothing to be gained or lost by putting silicone there.

Now the check valve is attached to the rubber seal, and the whole shebang is reinstalled into the manifold. A little extra silicone smeared around the edge of the rubber seal is extra insurance against further boost leaks.

That’s it. Everything is reinstalled and we’re back in business. As a note of caution, always be careful when tightening bolts into aluminum, such as the three IACV to manifold bolts. I don’t know the exact torque spec, but you’re better off under tightening the bolts and having a boost leak (which can be tightened up and fixed) rather than over tightening and stripping the threads out of the manifold (which is not an easy thing to fix).
Give the silicone time to cure. Overnight is best. The danger of starting your car up right away is the possibility that the still soft silicone will make its way into the check valve, or past it and into the manifold. Silicone doesn’t belong anywhere near intake valves and engine cylinders!
With my HKS boost controller set on minimum setting, supposedly this reverts back to a factory boost level. As you can see here, before sealing the IACV a third gear pull on factory boost gives a maximum reading of 73kPa (about 10.5 psi). That’s a bit low. It also doesn’t come on until about 3500-4000 rpm.

With the IACV boost leak fixed, a small boost increase was had, but more importantly it came on a few hundred RPM earlier.

To make sure it sealed properly, the last step was to remove the intercooler and boost-check the manifold again. Nothing leaked from the IACV this time. Success!
Incidental supplies:
Red RTV silicone
q-tip
cleaning solution
No comments:
Post a Comment