I recently got some practice removing and setting my rear differential from the Samurai. I call it “practice” because it was a lot of work that didn’t actually need to be done!

Here’s the scoop: I noticed that my rear differential had a ton of play in it. That is, I could rotate the driveshaft about 30 degrees before it actually caught and started to move the truck. That’s not normal. It should only rotate about 5 degrees or so, so I was a bit worried.
I’ve had some bad luck with differentials in this truck, so I got to work removing it so I could fix whatever problem I found before it became a BIG problem.
I started by raising the truck on jack stands and draining the differential oil. I used an old washer fluid bottle so I could potentially reuse the oil if I wanted to.

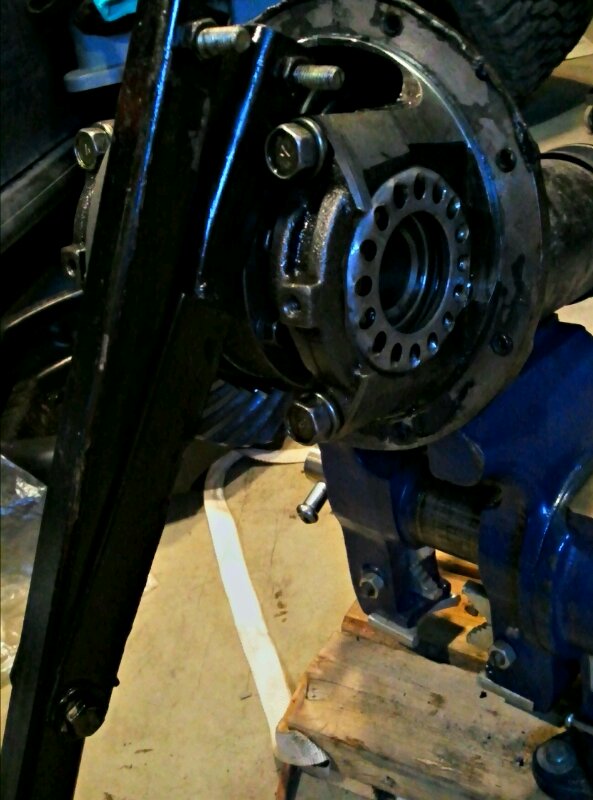
Then the driveshaft and traction bar were removed from the front side of the axle.

In this picture you can see the driveshaft held up by a piece of wire. It’s a good idea to support a disconnected driveshaft, as u-joints can be damaged by letting the shaft flop down at a large angle. The traction bar is the y-shaped piece attached to the diff.

Traction bar disconnected:

Then the drum brakes had to be removed in their entirety. That means disconnecting brake fluid lines and emergency brake cables.

Then the four nuts on the back of the drum are removed and it can be yanked off with a slide hammer. I use a chunk of wire wrapped around the wheel studs to give the slide hammer something to pull on.

A few good pulls and the axle shaft is free from the differential. It can stay put in the axle housing.

Then the other side!
With the axle shafts no longer inside the differential, we can get to work removing it. The bolts surrounding the differential are removed, and now it’s only held on with sealant. It can be a pain to break the sealant, so a jack and a chunk of wood provides some leverage to get it free.

Pop! It’s free. (and heavy!)

Next step, pull it apart and try to figure out why it’s moving around so much.


Here’s a somewhat… suggestive… video showing that the play is actually in the carrier and not between the ring and pinion gears.
(note: once upon a time there was a YouTube video here of me rocking the carrier back and forth in the diff housing, but it seems I've deleted that video from my YouTube account)
This is where I find out that all the work I just did (and will continue to do to put it back together) was a mistake! Apparently, the locker I installed in the differential (Lock Right) before putting Sammy into hibernation is the cause of the play. Automatic lockers of this type all have a lot of play built-in as part of the locking mechanism. It’s normal. There’s nothing that can be done about it.
You can see in the video that when the drive shaft turns, the pinion shaft in the differential turns and hits the big ring gear. All of this has next to no play. The ring gear turns the carrier, which is that the axle shafts are connected to. Before the axles turn and the wheels turn, the play in the carrier assembly needs to be taken up, which causes a bit of a bang and a jump when accelerating from a stop.
It’s uncomfortable and noisy and not healthy for the driveline, but it is effective off road! I don’t think I would want something like this in a vehicle I drive often on the street, but for a trail truck it works.
Back together it goes.

Since I removed the ring gear and carrier, I have to do some fine adjustments to set the gear tolerances in the differential. There are two important adjustments here (if the pinion gear is removed it gets a little more complicated). The ring gear needs to contact the pinion gear with an exact amount of space between the two, and the bearings in the differential need to be squeezed together with a fairly exact amount of force.
Here’s the method I used, as described by Puffdragon on pirate4x4.com:
The spanner nut is the disc with the holes in it on each side of the diff. I made my own tool to adjust them (pictured below - the two bolts fit into the holes on the spanner nut), but some people use a hammer and punch to force the spanner nut to turn (not recommended).

Moving the nuts in and out moves the ring gear closer or farther away from the pinion, which adjusts the amount of play (or “lash”) between the two gears. I set mine to about 5 thousandths of an inch, as indicated on my dial gauge:

I then set the bearing preload as per Puffdragon’s method. Ideally, you would torque these spanner nuts to a specified torque, but I don’t have any way of getting my torque wrench on there.
Once it’s set up and the bolts are tightened down, it’s time to reinstall. All mating surfaces are thoroughly scraped and cleaned to get rid of the old adhesive.

And then the new black RTV silicon is applied.

It is then a bit tricky to reinstall the heavy differential into the axle housing without smearing the silicon all over the place. It took me two attempts.
After it’s back in, everything gets bolted back together just as it came apart. The brakes will need bleeding to get the air out that was let in when the lines were opened up.
And there you have it. Many hours of work just so I can say that my truck was in fact working as it is supposed to! I did manage to soften and quiet the engagement of the locker by using some new really heavy gear oil in the axle instead of the medium-weight stuff that was in there.
I learned all I know about removing and setting up Samurai differentials by reading this guide from Geckocycles. Since I first read that (many years ago) and nervously removed my first differential, I think I have done it about five times on this truck! It’s pretty familiar territory at this point, but can be a daunting task for a first-timer. If you’re thinking about tackling differential work, read as much as you can and then dive in. It’s the only way to learn.

Here’s the scoop: I noticed that my rear differential had a ton of play in it. That is, I could rotate the driveshaft about 30 degrees before it actually caught and started to move the truck. That’s not normal. It should only rotate about 5 degrees or so, so I was a bit worried.
I’ve had some bad luck with differentials in this truck, so I got to work removing it so I could fix whatever problem I found before it became a BIG problem.
I started by raising the truck on jack stands and draining the differential oil. I used an old washer fluid bottle so I could potentially reuse the oil if I wanted to.

Then the driveshaft and traction bar were removed from the front side of the axle.

In this picture you can see the driveshaft held up by a piece of wire. It’s a good idea to support a disconnected driveshaft, as u-joints can be damaged by letting the shaft flop down at a large angle. The traction bar is the y-shaped piece attached to the diff.

Traction bar disconnected:

Then the drum brakes had to be removed in their entirety. That means disconnecting brake fluid lines and emergency brake cables.

Then the four nuts on the back of the drum are removed and it can be yanked off with a slide hammer. I use a chunk of wire wrapped around the wheel studs to give the slide hammer something to pull on.

A few good pulls and the axle shaft is free from the differential. It can stay put in the axle housing.

Then the other side!
With the axle shafts no longer inside the differential, we can get to work removing it. The bolts surrounding the differential are removed, and now it’s only held on with sealant. It can be a pain to break the sealant, so a jack and a chunk of wood provides some leverage to get it free.

Pop! It’s free. (and heavy!)

Next step, pull it apart and try to figure out why it’s moving around so much.


Here’s a somewhat… suggestive… video showing that the play is actually in the carrier and not between the ring and pinion gears.
(note: once upon a time there was a YouTube video here of me rocking the carrier back and forth in the diff housing, but it seems I've deleted that video from my YouTube account)
This is where I find out that all the work I just did (and will continue to do to put it back together) was a mistake! Apparently, the locker I installed in the differential (Lock Right) before putting Sammy into hibernation is the cause of the play. Automatic lockers of this type all have a lot of play built-in as part of the locking mechanism. It’s normal. There’s nothing that can be done about it.
You can see in the video that when the drive shaft turns, the pinion shaft in the differential turns and hits the big ring gear. All of this has next to no play. The ring gear turns the carrier, which is that the axle shafts are connected to. Before the axles turn and the wheels turn, the play in the carrier assembly needs to be taken up, which causes a bit of a bang and a jump when accelerating from a stop.
It’s uncomfortable and noisy and not healthy for the driveline, but it is effective off road! I don’t think I would want something like this in a vehicle I drive often on the street, but for a trail truck it works.
Back together it goes.

Since I removed the ring gear and carrier, I have to do some fine adjustments to set the gear tolerances in the differential. There are two important adjustments here (if the pinion gear is removed it gets a little more complicated). The ring gear needs to contact the pinion gear with an exact amount of space between the two, and the bearings in the differential need to be squeezed together with a fairly exact amount of force.
Here’s the method I used, as described by Puffdragon on pirate4x4.com:
Ok, so you have a 3rd with a properly set up pinion, now you need to set up the carrier. This is what you do. Place the carrier with new bearings (hopefully) into the 3rd member. Lightly turn the cap bolts in just to take up slack. Turn the spanner nut on the tooth side of the ring gear out just untill you start to see threads. Now turn in the spanner on the back side of the ring gear, untill you reach absolute zero backlash. The spanner nut must be capable of locking with the cap pin, so turn in or out untill you line up with one of the spanner holes. New bearings can be turned in a bit, but if you have old bearings, it would be best to back off, but this is a judgement call.. Just try to maintain zero backlash. Now, turn in the tooth side spanner, untill you acheive the desired backlash. This will set up the backlash, and the desired bearing preload. Tighten the cap bolts, lock down both spanner nuts, and pattern. This is the official Land rover setup.
Have fun!!
The spanner nut is the disc with the holes in it on each side of the diff. I made my own tool to adjust them (pictured below - the two bolts fit into the holes on the spanner nut), but some people use a hammer and punch to force the spanner nut to turn (not recommended).
Moving the nuts in and out moves the ring gear closer or farther away from the pinion, which adjusts the amount of play (or “lash”) between the two gears. I set mine to about 5 thousandths of an inch, as indicated on my dial gauge:

I then set the bearing preload as per Puffdragon’s method. Ideally, you would torque these spanner nuts to a specified torque, but I don’t have any way of getting my torque wrench on there.
Once it’s set up and the bolts are tightened down, it’s time to reinstall. All mating surfaces are thoroughly scraped and cleaned to get rid of the old adhesive.

And then the new black RTV silicon is applied.

It is then a bit tricky to reinstall the heavy differential into the axle housing without smearing the silicon all over the place. It took me two attempts.
After it’s back in, everything gets bolted back together just as it came apart. The brakes will need bleeding to get the air out that was let in when the lines were opened up.
And there you have it. Many hours of work just so I can say that my truck was in fact working as it is supposed to! I did manage to soften and quiet the engagement of the locker by using some new really heavy gear oil in the axle instead of the medium-weight stuff that was in there.
I learned all I know about removing and setting up Samurai differentials by reading this guide from Geckocycles. Since I first read that (many years ago) and nervously removed my first differential, I think I have done it about five times on this truck! It’s pretty familiar territory at this point, but can be a daunting task for a first-timer. If you’re thinking about tackling differential work, read as much as you can and then dive in. It’s the only way to learn.
No comments:
Post a Comment