Was it really almost a year ago that I first replaced my then-new-to-me Subaru’s brake pads? When I was doing so, I noticed that one of the eight front brake pistons was hopelessly stuck. It went on my long-term to-do list to rebuild the front calipers, and I finally got around to it. With seven other pistons still working, one dud actually didn’t affect overall braking too much.
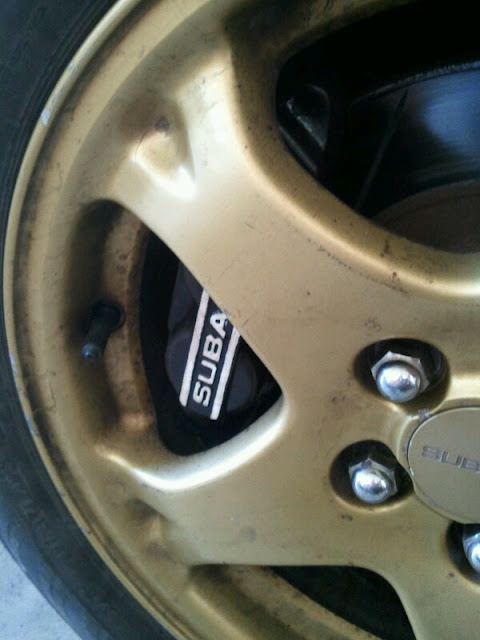
Subaru put the nice big 4-piston calipers in my car, which is nice for braking but makes it a much bigger job for rebuilding. Consider that your average passenger car has only one piston per corner.
This jobs started with a question: how can I extract that stuck brake piston? Getting it back in the caliper was easy enough. Getting it out would be tougher. The answer lies in hydraulic pressure - ie. the brake pedal. I left the non-stuck caliper installed and pulled off the caliper with the stuck puck. I jammed some scrap steel between the two good opposing pistons to restrict their movement, and put a C-clamp on the one remaining non-stuck piston.

It took a LOT of force, standing on that brake pedal, but eventually the piston relented and budged. I used the same method on the non-stuck pistons to get them as extended as possible before disconnecting the calipers. It worked out that the two brake pads jammed into the caliper were just about the right distance to prevent the pistons from popping completely out (and making a brake-fluidy mess).

With the pistons extended, the calipers could be removed from the car. Not wanting to repeat the mistakes of the last brake job (when the brake fluid siphoned out the lines and left the reservoir dry) I covered the line ends with plastic wrap and tightened it down with an elastic band to slow the leaking. Note that the caliper has been loosely reinstalled to make it easier to break loose the brake line banjo bolt.

After draining the calipers, they go up on the bench for disassembly.

I got a little rough with my pistons, using some channel locks to remove them. This gouged some of them a little on the very ends. No big deal - the important part of the piston (under the groove) was undamaged. Still, gentler methods would have been better. I used a small prybar and screwdriver for some of them which was kinder to the finish. In single-piston calipers, compressed air can work well to shoot out the piston.
Ew. What came out was dirty and nasty:

Tools of extraction: Channel locks with a rag over the jaws worked for brute force piston pulling, screwdriver and prybar for gentler persuasion, and a dental pick for removing the rubber seals:

There are rubber seals on the outside of the piston, but the real seals lie inside the caliper bores in a groove running around the circumference. The dental pick works great on these.

With the pistons and seals removed, it’s just a matter of cleaning things up. I used a clean rag to give a quick cleaning to the bores, then hit the calipers with the wire wheel on my bench grinder and a wire brush. Left side brushed, right side dirty:

For a complete caliper rebuild, one would need to separate each of these calipers into two halves by removing the bolts you can see in the picture above. However, I have heard that it can be very difficult to get them to seal properly after they have been separated so I opted to leave them assembled.
I gave them a good cleaning with wax and grease remover, and masked off all the holes. I then sprayed them with some newfangled rust converter stuff I found at the auto parts store, as a new experiment. That was followed up by a few coats of Tremclad high heat enamel in gloss black. Once all that was dry, I went over the embossed Subaru logo with a small brush and a steady-ish hand with the finishing touch white paint.

At this point I set to cleaning up the pistons themselves. They were all in pretty decent shape except for that one stuck piston, which had some notable rust on the piston edge. I tried sanding off the rust, but I ended up sanding right through the nickel coating on the piston, thus creating a rust time-bomb out of my unprotected-steel brake piston. Grudgingly, I ordered a single replacement piston from the local Subaru dealer.
The other pistons polished nicely with some synthetic steel wool followed by some 500-grit sandpaper.

I also polished the bores in the calipers with the same method, and gave it a final cleaning which included using q-tips to clean out the seal grooves. I lined up all my parts and poured a gin and tonic. Gin is very important for brake rebuilding.

New seals, one new paper-wrapped piston, seven old reusable pistons, and one upside-down paperweight.
I started with the inner seals, which came pre-greased in my kit and popped nicely into place.

Then it was time to put in the pistons. The kit came with some red high-temp grease and I used a tiny paintbrush to evenly coat the sides of the piston.

The outer seal can then be put into the groove on the piston and the whole thing can be pushed into the caliper bore, but not quite all the way. It’s a little easier to put the outer seal on the caliper if the piston hasn’t been fully inserted.

Repeat 7 more times, then the new outer seal rings can be installed. There’s not much to say about these - you get the hang of it after installing one or two.

Whole again!

That bag is from my caliper rebuild kit. Yes, it’s from Nissan. This caliper design was shared by Subaru and Nissan (for their last-generation 300ZX) and pads, seals, and pistons are all the same. It’s easier to find parts for the “Nissan” calipers.
Once it’s all together, shove all the pistons into the bores and make sure the seals are well in place and that the pistons slide smoothy. I shot in some low-pressure compressed air to make sure they were also extending smoothly.
I couldn’t very well put old, rusted, cheap pads back into my rebuilt calipers, so I decided to load in some new Hawk HPS pads. Freshly rebuilt calipers deserve better than Ebay garbage! Actually, I bought the Hawks off Ebay too…

I also gave my rotors a quick sanding with some 100-grit to accommodate the new pads, then everything was reinstalled. There was, of course, much brake bleeding to be done to get all the air out of the calipers, and my darling wife came to the rescue with the best pedal pushing I have ever seen.
The new pads were burnished (or “bedded-in”) according to Hawk’s instructions: 6-10 moderate stops from 50 kph, then 2-3 aggressive stops from 70 kph, then allow the brakes to cool.
So far, I still feel like the pedal is a bit spongy. I was hoping that the rebuild and new pads would fix that. I may have gotten air into the ABS module when I let the master cylinder go dry on my first brake job. If that is the case, I may have to bite my lip and take the car to a Subaru dealer so they can bleed the brakes with their computer hooked up to the ABS module. Damn proprietary computer-controlled whatchamacallits - they will be the death of the home mechanic.
Cost:
$30 - Nissan 300ZX front caliper rebuild kit (Ebay)
$35 - Subaru replacement brake piston (Calgary Subaru)
$10 - big jug of DOT4 brake fluid
==$75 for the caliper rebuild
$25 - paint and paint-like stuff
$100 - Hawk HPS brake pads (Ebay)
==$125 for the optional extras
No comments:
Post a Comment